Linux user groups are important for managing user access and privileges, simplifying administrative tasks, and ensuring security within the operating system. Understanding how to add users to groups is crucial for both system administrators and users, as this process controls access to certain resources and features.
In this article, you will learn how to effectively add users to Linux groups. Whether you're an experienced administrator or a Linux novice, this guide will provide you with the knowledge and skills you need to effectively manage user access and privileges in your Linux environment.
Step-by-Step Guide: Adding a User to a Group in Linux
Prerequisites:
Before adding users to groups on Linux, some certain prerequisites must be met and they are:
1. Sudo privileges: To modify user accounts and group membership, you must have sudo privileges or be logged in as the root user.
2. Know the username: You must know the username of the user you want to add to the group.
3. Understand group name: Identify the name of the group you want to add the user to.
Step 1: Access the terminal:
Access the terminal on your Linux system. It's typically located in the Applications menu, but the exact location may vary depending on your distribution. Alternatively, use the appropriate method to open the terminal for your system.
Step 2: Check current group membership:
Before adding a user to a group, it's important to check which groups the user is already a member of to ensure they aren't already in the group we're adding them to. Use the following command:
Groups username
Replace "username" with the user's actual username.
Step 3: Add user to the group:
Use the 'usermod' command to add the user to the group. Here's how:
sudo usermod -aG groupname username
Replace "groupname" with the name of the group and "username" with the user's username.
- Add a user to multiple groups: To add a user to multiple groups at once, separate the group names with commas after the '-aG' option in the usermod command.
- Using the gpasswd command as an alternative method: Another way to add a user to a group is to use the 'gpasswd' command, which allows you to manage group passwords and membership. For adding users to a group, you can use the -a flag followed by the desired group name to append the specified group to the existing groups the user is in, instead of overwriting them. For example:
gpasswd -a username groupname
Step 4: Verify a user's group membership:
After you add a user to a group, use the 'groups' command with the username to verify that the user is a member of the specified group. Here is the command:
groups username
This step ensures that the changes are applied successfully and that the user has the expected group memberships.
Step 5: Log out and log in again (optional):
Users may need to log out and log in again for changes to group membership to take effect. Ask your users to do this if necessary.
Step 6: Test Access (Optional):
If you added the user to a group to grant access to specific resources, test to ensure the user can access those resources as expected. This step confirms that the changes have been implemented successfully.
Linux User Groups: An Overview
What are Linux user groups?
Linux user groups are collection of user accounts that share common permissions to access files, directories, and resources on a Linux system. Administrators can assign privileges to multiple users at the same time, simplifying user management and increasing security.
For example, a group such as "Developers" can access programming tools and source code repositories, and "Administrators" can configure system settings and manage users.
Primary vs. Secondary Groups
Primary Group: Every user on Linux has a primary group specified in their account settings, which is used as the default group for new files and directories they create.
Secondary Group: Users can belong to multiple secondary groups and access shared resources among group members without needing to be in the primary group.
Benefits of Using Groups
Simplify privilege management: Assigning privileges to groups streamlines access control, especially in environments with many users and resources.
Enhanced security: Groups help you allow or restrict access to sensitive files based on a user's role, reducing the risk of unauthorized access.
Facilitate Collaboration: Organizing users into groups based on responsibility promotes teamwork and resource sharing.
Streamlined administration: Adding or removing users from relevant groups simplifies role changes and avoids changing individual permissions.
Common Issues
Fix errors like "User does not exist" or "Group does not exist": If you encounter these errors, double-check the spelling of the username or group name. Use the "id" command followed by the username or group name to verify that they exist on the system.
Resolves permission issues such as "Permission Denied error": If your users face these errors after group addition, then check the file or directory permissions. Use 'ls -l' to view permissions and consider referring to authoritative resources for detailed instructions on using 'chmod' to adjust them if necessary. Also, make sure the user is accessing the resource with the correct group permissions.
Tips for effective group management:
Create separate groups: For precise control over permissions, consider creating separate groups for each department, project, or access level.
Documentation: Document group membership and associated permissions for organized user management.
Best Practices for User and Group Management in Linux
Regular updates
Review and update group membership: Update user group membership periodically to reflect changes in roles and access requirements.
Reduce Risks: Regular audits ensure that users have appropriate access rights, minimizing unauthorized access and security risks.
Automation: Use automation tools to update group membership, especially in environments with many users and groups.
Understanding Critical Groups:
Exercise Caution: Groups such as "sudo" and "wheel" have elevated permissions for administrative tasks.
Security Concern: Be careful when adding users to these groups to avoid compromising the security of your system.
Restrict access: Limit sudo or root access to those users needed for work tasks, and regularly check membership in important groups.
Security Considerations:
Strong Password Guidelines: Apply strong passwords to prevent unauthorized access.
Multi-factor authentication (MFA): Implement MFA for an added layer of security, especially for elevated users.
Regular updates: Keep Linux and software up to date to resolve security vulnerabilities.
Monitor User Activities: Monitor access logs to detect suspicious behavior and respond quickly.
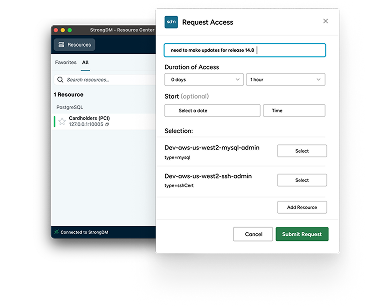
Simplifying User and Group Management with StrongDM
Introducing StrongDM:
StrongDM is a platform designed to simplify access control and user management for many types of infrastructure, including Linux systems.
Administrators can manage user access to databases, servers, and other resources, including Linux servers, from a single, unified interface.
Streamlined Access Control with StrongDM:
Automated Provisioning: StrongDM automates user provisioning and access control, reducing the manual effort of managing user accounts and group membership on Linux systems.
Granular Access Policies: Administrators can define granular access policies based on roles, allowing users to access the right resources without unnecessary privileges.
Benefits of StrongDM:
Improved Security: SrongDM's Centralized access control and auditing capabilities help enforce security policies and monitor user activity effectively.
Ease of use: StrongDM's intuitive interface simplifies the management of user access and privileges across various infrastructures without the need for complex configuration.
Time-saving features: It saves administrators valuable time and resources by automating user provisioning, access blocking, and policy enforcement.
Book a demo with us to discover how StrongDM simplifies user and group management on Linux and optimizes access control across heterogeneous infrastructures.