SSH is the backbone of remote access on Linux systems—and if you're running Ubuntu, enabling SSH is often one of the first things you'll do. But enabling it securely is what really matters.
From installing OpenSSH and adjusting firewalls to enforcing key-based authentication and disabling root login, a secure setup takes more than just flipping a switch.
This guide walks you through every step, plus how to make SSH access safer and simpler with centralized control, just-in-time access, and full audit trails that eliminate static keys and manual headaches.
Prerequisites
Before you enable SSH on Ubuntu, there are several requirements you must meet, including:
- An Ubuntu server pre-installed with OpenSSH. For Ubuntu Desktop, you must install it manually
- An active internet connection to download and install packages
- Access to a terminal or shell to run commands for installation and configuration
- Root or sudo privileges on your system
- An understanding of firewalls and port configurations
How to Enable SSH on Ubuntu
Once you have everything in order, you can start the process of installing SSH. Here’s how:
1. Update System Packages
Keep your system packages current to ensure they have the necessary software dependencies for SSH to operate efficiently. To do this:
- Open the terminal and run the following command: sudo apt update. This will download the latest package information.
- To install the latest versions of the installed packages, run this command: sudo apt upgrade.
- You’ll receive a prompt asking you to confirm to proceed. Type y to continue with the upgrade.
- (Optional) Restart your system using the sudo reboot command, depending on the update.
2. Install OpenSSH Server
At the terminal prompt, use the command below to install the OpenSSH server:
sudo apt install openssh-server
3. Enable and Start the SSH Service
Activate the SSH service and start immediately by typing the command below:
sudo systemctl enable --now ssh
Next, confirm the status of the server you just installed with this command:
sudo systemctl status ssh
If successful, you’ll receive this confirmation message:
Active: active (running)
4. Adjust the UFW Firewall
By default, the uncomplicated firewall (UFW) is usually configured to deny all incoming traffic. If it's not adjusted, you can’t connect to your server remotely via SSH.
Here’s how to adjust it:
- Type sudo ufw allow ssh to allow connections on the default SSH port (usually 22).
- Run sudo ufw enable to activate the firewall.
- If you hadn’t enabled UFW before, a prompt will appear informing you that the adjustment will disrupt SSH connections. However, since you’ve already allowed SSH, your connection should remain intact.
- Verify that you’ve activated the firewall using sudo ufw status.
Configure SSH for Enhanced Security
After you successfully enable SSH on Ubuntu, you must configure it because its default settings can make it vulnerable to malicious actors. To customize it, you should edit the SSH configuration file: /etc/ssh/sshd_config. This file contains many directives that control features like authentication modes and communication settings.
Here are some steps we recommend to enhance security:
Change Default Port
Since it’s common knowledge that the default port number is 22, it’s best to change it as a security best practice. While this reduces the number of automated scanning attacks in a technique known as security through obscurity, it shouldn’t be the only line of defense.
Here’s how to do this:
Back up the config file first.
sudo cp /etc/ssh/sshd_config /etc/ssh/sshd_config.bak
Launch the SSH configuration file and use a text editor to run the following command:
sudo nano /etc/ssh/sshd_config
Then, find the line that specifies Port 22 in the file, and change it to the port you want, such as Port 2111.
Disable Root Login
If you can log in remotely using root, this can be a gateway for hackers who want to take over your system. Therefore, it’s best to disable it.
From the configuration file, find the line that enables root login. It should look like this: PermitRootLogin yes. Change it to PermitRootLogin no.
Restart the SSH services for the changes to take effect using this command: sudo systemctl restart ssh.
Limit Authentication Attempts
You can prevent attackers from using brute force attacks by limiting how many times a user can try logging in. For instance, if you want to limit the number of tries to only two, you can set this in the configuration file as shown below:
MaxAuthTries 2
Disable Password Auth:
Passwords are susceptible to theft by hackers using techniques like brute force attacks, keylogging, and man-in-the-middle attacks. SSH keys offer more security because they eliminate the need to type passwords to log in.
To enforce SSH keys, set PubkeyAuthentication yes in the sshd_config file. Also, disable password authentication by setting PasswordAuthentication no.
NOTE: Confirm that key-based auth works before disabling passwords to avoid lockout by opening a second terminal session and connecting to your server using your SSH key.
Lastly, don’t forget to restart the service to save the changes:
sudo systemctl restart ssh
Set Up SSH Key-Based Authentication (Recommended)
SSH keys come in pairs: the public key and the private key. The private key gets stored by the client and should remain secret, while its associated public key lives on the remote server you need to access. The public key can be distributed freely without any problems. When a client tries to log in to the server, it must prove that it possesses the private key. If the client does, the server authenticates it.
1. Generate SSH Key Pair (Client-Side)
From your local computer, you can generate an SSH key pair by using the ssh-keygen command. To do this:
- Type the following:
ssh-keygen
The output will look like this:
Generating public/private rsa key pair.
Enter the file in which to save the key (/home/username/.ssh/id_rsa):
- Press Enter, and the location of the keys will be the ~/.ssh directory in your home directory.
- You’ll then receive a prompt to create a passphrase for the private key. While optional, a passphrase prevents an attacker from logging in with your private key if they accidentally accessed it. The default key type in newer versions is ED25519, and if RSA is desired, you can run:
ssh-keygen -t rsa -b 4096
- When you enter a paraphrase, the system will ask you to re-enter it.
- Press Enter, and you will have created SSH keys.
2. Copy Public Key to Ubuntu Server
There are several methods to copy and send the public key you created to the server. For this illustration, we’ll use the ssh-copy-id utility. Worth noting is that you must be able to access your server via password for this method to work.
Here’s the command to use:
ssh-copy-id username@your_server_ip
NOTE: This command requires openssh-client to be installed locally, which is usually present but worth confirming
3. Enforce Key-Based Logins
With the SSH keys now in place, you can disable password authentication in the /etc/ssh/sshd_config file.
Example SSH hardening settings:
Port 2111
 PermitRootLogin no
 PasswordAuthentication no
 ChallengeResponseAuthentication no
 PubkeyAuthentication yes
MaxAuthTries 2
Restart the SSH service using sudo systemctl restart ssh to save the changes.
Testing SSH Access from Another Machine
After configuring SSH and setting up authentication, you can test whether access is possible. From the machine’s terminal, use the ssh command as shown below:
ssh -p your_port_number your_username@your_server_ip
The -p flag is only necessary if the default port was changed.
Automate SSH Setup with a Script (Advanced)
Enabling SSH on Ubuntu can be quite the task, especially if you have a lot of configurations to do. That’s why you have the option of automating the installation and configuration processes with scripts. Here’s a sample script you can use to do this:
#!/bin/bash
 set -e
 sudo apt update
 sudo apt install -y openssh-server
 sudo systemctl enable --now ssh
 sudo ufw allow ssh
 sudo ufw enable
To disable root login and change port, use:
sudo sed -i "s/^#\?Port .*/Port ${SSH_PORT}/" $SSH_CONFIG
 sudo sed -i "s/^#\?PermitRootLogin .*/PermitRootLogin no/" $SSH_CONFIG
Troubleshooting Common SSH Issues
As is usually the case with many processes, you should be prepared to encounter a few issues when attempting to install and configure SSH on Ubuntu. Two of the most common errors include:
1. Connection Refused
You’ll typically see this error if the SSH service isn’t running on the server or if a firewall is blocking the connection.
How to Fix It:
- Check the SSH service status:
sudo systemctl status ssh
- Allow SSH through the firewall:
sudo ufw allow ssh
2. Permission Denied (publickey)
This error usually indicates a problem with your SSH key authentication. You might be using the wrong key or attempting to log in with password authentication when the server is configured to accept only keys.
How to Fix It:
- Ensure your public key is added to the authorized keys file:
~/.ssh/authorized_keys
- Set the correct permissions:
chmod 700 ~/.ssh chmod 600 ~/.ssh/authorized_keys
- Verify proper ownership of the
.ssh directory and its contents:
chown -R $USER:$USER ~/.ssh
StrongDM’s Approach to Securing SSH Access on Ubuntu
Enabling SSH on Ubuntu is a critical first step for remote access—but doing it securely is what protects your infrastructure from unauthorized access and misconfigurations. From port changes to key-based authentication, strong defaults are essential—but so is visibility and control.
That’s where StrongDM comes in. While SSH configuration starts with OpenSSH and UFW, it should end with centralized, audited, and identity-based access. Here's how StrongDM simplifies and strengthens SSH security:
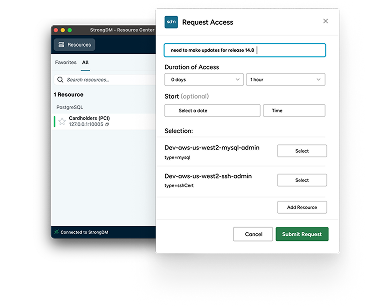
1. Replace Static SSH Keys with Just-in-Time Access
Manually managing SSH keys is error-prone and risky. StrongDM replaces long-lived keys with ephemeral, identity-based credentials:
- No more distributing SSH keys or
.pem files
- Access is provisioned just-in-time based on policies
- Keys are automatically rotated and revoked
Result: no lingering keys, no forgotten access, and no risk of leaked credentials.
2. Centralize Access Control and Visibility
Managing multiple SSH configurations across machines is a mess. StrongDM gives you:
- A single place to assign and revoke access to any Ubuntu server
- Session-level logging that shows who connected, when, and what they did
- RBAC to scope access down to specific users, teams, and timeframes
Even if you use multiple ports, proxies, or hostnames—StrongDM abstracts it all.
3. Eliminate Root Logins and Enforce Zero Trust
SSH access to the root user is a security hole. StrongDM enforces:
- No root access by default
- MFA before access is granted
- Per-command and per-session policies to prevent escalation
You don’t need to edit sshd_config manually or hope your team follows protocol—StrongDM enforces it.
4. Audit and Monitor SSH Sessions Automatically
No more grepping log files or chasing down missing sessions. StrongDM automatically logs:
- Who accessed what server and when
- Which commands they ran
- Where they connected from
You can export logs to SIEM tools (Splunk, Datadog, Elastic) and replay sessions for compliance or investigation.
5. Scale Secure SSH Access Without Scripts or Manual Hacks
Whether you’re managing one server or a thousand, StrongDM:
- Integrates with your identity provider (Okta, Azure AD, etc.)
- Supports Ubuntu, CentOS, RHEL, and more
- Enables secure access across firewalls and NAT without VPNs
No more patching shell scripts to harden SSH across environments—StrongDM handles it from a central dashboard.
Manual SSH setup is a start. StrongDM is how you secure it—at scale, in real time, and without the operational overhead.
Book a StrongDM demo to see how we make SSH access secure by default.