Linux file permissions are the gatekeepers of your system—they decide who can read, write, or execute files and directories. They’re powerful, flexible, and absolutely critical for securing your infrastructure.
But with special bits, ACLs, and recursive commands in the mix, managing permissions can get complicated fast—and small missteps can open big security gaps.
This guide breaks down how Linux file permissions work, how to manage them safely, and how to simplify the chaos with centralized access, real-time audit logging, and role-based control—so you don’t have to juggle chmod and chown on your own.
What Are Linux File Permissions?
Linux file permissions define which users and groups can read, write, or execute a file or directory. Each file has permissions assigned to the owner, group, and others, using combinations of read (r), write (w), and execute (x) rights to control access and enforce system security.
Understanding Users and Groups in Linux
In Linux, a user is more than just a name—it’s a distinct identity defined by a User ID (UID) and a set of permissions that control access to system resources. To streamline access control, users can be grouped under a Group ID (GID), which allows administrators to manage permissions for multiple users in one go.
Each user is assigned a primary group—typically created automatically with the same name as the user account. This group defines the default permissions for files and processes created by the user. Beyond that, users can be added to one or more secondary groups, enabling access to additional shared files and directories across the system.
It’s important to know this behavior can vary across distributions. For instance:
- Debian/Ubuntu default to a user private group model, where each user gets a dedicated primary group.
- RHEL/CentOS may not follow this model unless configured to do so explicitly.
User and group information lives in plain text:
/etc/passwd – stores basic user account details./etc/group – tracks group memberships.
To inspect user details and group memberships, Linux offers straightforward commands:
id username – shows the UID, GID, and all associated groups.groups username – lists only the group names the user belongs to.
For system administrators, understanding this structure is essential for managing secure access and maintaining system hygiene—especially when enforcing least-privilege principles at scale.
File and Directory Permissions Explained
Linux permissions generally fall into three categories: read (r), write (w), and execute (x).
The read (r) permission means a user can list the contents of a directory or view the contents of a file. As for write (w), users can create, modify (edit), or delete a file or directory. Lastly, the execute (x) permission lets users run a program or file. x also means users can enter and navigate a directory.
The Permission Triplet: rwx Explained
The rwx permission triplet represents the permissions for each category: owner, group, and others. This representation using letters is referred to as the symbolic mode.
Take, for example, this permission string format:
-rwxr-xr--
- The first character (-) represents file. If it were a d, it would represent directory.
- rwx represents owner permissions
- r-x represents group permissions
- r-- represents others’ permissions
The permission triplet can also take the octal format, which uses numbers to represent permissions, where r = 4, w = 2, x = 1, and - = 0. Then the permissions are grouped into triplets and summed up to get the octal representation.
So if we were to represent -rwxr-xr-- in an octal format:
- rwx = 4 + 2 + 1 = 7
- r-x = 4 + 0 + 1 = 5
- r-- = 4 + 0 + 0 = 4
Which adds up to 754.
Changing Permissions with chmod
As an admin, you can change Linux permissions for files and directories through the chmod command line utility (CLI). chmod simply stands for “change mode,” and you can use it in both the symbolic and octal modes.
Symbolic Mode
For this mode, you can use chmod together with symbols like +, -, and = to add, remove, or set specific permissions. At the end of the syntax, the file name is then attached. Also, you’ll occasionally see u, which represents rights for the owner, g for group, and o for others.
For instance:
chmod u+x filename.txt
This syntax adds the execute permissions to the owner only in the file filename without affecting others.
Numeric Mode
Here, chmod also appears before the permissions representation and the file name as shown in the example below:
chmod 754 filename.txt
The above command simply translates into -rwxr-xr–, which means the file owner can read, write, and execute, while the group can only read and execute. Others can only read the file.
Recursive Changes
If you need to update the permissions of an entire directory, you can use the recursive (-R) option together with chmod. For instance:
chmod -R 754 my_dir
The recursive -R tells chmod to set the permissions for the directory my_dir to 754 (read, write, and execute for the owner; read and execute for the groups; read for others).
NOTE: Always use the recursive chmod cautiously because the slightest mistake can affect a large number of files and potentially create security or configuration issues.
Default Permissions and umask
When you create a new file or directory on Linux, its default permissions automatically apply. The default before umask is applied for files is 666 (rw-rw-rw-), while for directories it’s 777 (rwxrwxrwx).
You can control these default permissions by setting the umask to remove some of the bits as shown below:
Permissions = Default - umask
The umask is a four-digit value (e.g, 0025), where each digit represents the permissions to deny for the owner, group, and others.
For instance, if you apply the umask (0025) to files and directories, the default permissions change to 641 and 752, respectively.
Special Permission Bits: setuid, setgid, sticky
Special permission bits permit only specific users (usually with elevated privileges) to run certain programs. These bits are:
- setuid: set user ID allows the file to be executed with the permission of the file’s owner, not the user running it.
- setgid: For files, setgid causes the process to run with the group ID of the file. For directories, it makes newly created files inherit the directory’s group.
- sticky bit: This setting only applies to directories, not individual files. It ensures that only the file owner, directory owner, or root delete or rename files within that directory. It is usually used for public directories like /tmp so users don’t accidentally delete files they don’t own.
ACLs: Advanced Permission Control
Access control lists (ACLs) offer more control for managing permissions compared to the traditional model, which is generally limited to user, group, and others. They let you define specific access rights for individual users or groups without changing the base file ownership. On some file systems like ext4, you must explicitly enable ACLs using the acl mount option.
ACLs have two main commands to achieve this: getfacl and setfacl.
getfacl lets you view the ACLs associated with a file directory, while setfacl allows you to modify or add ACL entries.
For instance, to view the ACLs for a file named fidel.txt, the command you’d use would look like this:
getfacl fidel.txt
You can also set a new ACL for a user or group by using the following basic syntax:
setfacl -m u:user:alice:rw testfile.txt
Changing Ownership with chown and chgrp
Changing file ownership and user group in Linux is another way you can control permissions and access. To do this, you can use either the chown or chgrp CLIs. Keep in mind that changing ownership requires you to have sudo or root privileges.
For instance,
sudo chown esther filename.txt
This changes the ownership of the file filename.txt to the user esther.
For chgrp, the example below changes the group ownership for filename.txt to the expats group.
sudo chgrp expats filename.txt
You can also change both the group and ownership using one command line, as shown below:
chown esther:expats filename.txt
Common Pitfalls and Best Practices for Managing Linux Permissions
Mistakes are bound to happen, especially when handling permissions manually. You can usually avoid them by being aware of the common ones, which include:
- Over-permissive settings: Some settings, like chmod 777, can expose your Linux system to attackers if not monitored or taken care of. It’s best to avoid using this kind of setting except in rare cases, like in the /tmp directory, which is world-writable but protected by the sticky bit. You can also use umask to restrict default Linux permissions.
- Incorrect ownership: If you give the wrong user ownership of a file or directory, it can lead to serious security issues like privilege escalation. Continuously check for ownership by using the ls -l command. You can also use ACLs to make sure you have granular control over permissions, especially for collaborative environments.
- Not auditing special bits: Bits like setuid or sticky bits are prey for attackers because they usually carry root privileges. If unmonitored, hackers can use them to escalate their privileges and cause serious damage to your system. To tackle this problem, you can use auditing tools with automation like StrongDM, which keep logs of sessions.
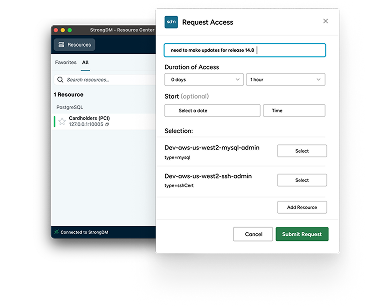
5 Scalable Ways to Replace Manual Linux Permissions with StrongDM
Linux file permissions are powerful—but managing them manually with chmod, chown, and ACLs at scale? That’s where things break down. Every mistyped command, every overly permissive setting, and every forgotten special bit becomes a potential backdoor. And as systems grow, so does the complexity.
StrongDM helps you go beyond reactive permission management and move toward a secure, scalable, and centralized access model for Linux environments.
1. Replace Static File Permissions with Role-Based Access
Instead of micromanaging access on every file and directory, StrongDM lets you define roles and grant access to entire systems, environments, and resources—all in one place.
- Role-based access controls (RBAC) ensure users only see what they need
- Temporary and time-bound access reduces long-lived permissions
- Real-time provisioning and revocation keeps access tightly aligned with user roles
Forget tracking which users have access to which files—StrongDM handles it.
2. Eliminate SSH Keys, Reduce Risk
Traditional Linux access relies on local users, group permissions, and static SSH keys—leading to credential sprawl and fragmented oversight. StrongDM replaces this with identity-based access:
- No shared or static SSH keys to manage
- Users log in through your identity provider (Okta, Azure AD, etc.)
- Permissions are tied to real identities, and sessions are fully auditable
Your team gets seamless access. You get total control.
3. Audit Access Automatically—Down to the File Level
StrongDM logs every SSH and sudo session, every chmod or chown, and every command run—automatically:
- Structured logs stream directly to your SIEM (Splunk, Sentinel, Datadog)
- Session recordings let you replay access events for forensics or compliance
- Alerts flag suspicious changes, such as unexpected permission escalations
You don’t just grant access—you get a full audit trail.
4. Simplify ACL and Special Bit Complexity
Need to enforce fine-grained access without juggling setfacl or monitoring risky setuid binaries?
StrongDM lets you:
- Enforce least-privilege access without relying on file-level ACLs
- Restrict privileged commands with policy-based access control
- Centralize oversight over sensitive directories and sudo activity
Instead of hunting for 777 permissions or forgotten sticky bits, your policies are enforced upstream.
5. Secure Shared Environments Without Over-Permissioning
Public directories, development sandboxes, shared servers—these are breeding grounds for over-permissioned files and misconfigurations. StrongDM helps teams collaborate without compromising security:
- Grant users access to systems—not individual file trees
- Restrict sudo access to specific commands or workflows
- Remove access automatically when roles or projects change
Everyone gets what they need—and nothing more.
Linux file permissions will always matter—but they shouldn’t be your first or only line of defense.
StrongDM enforces secure access before anyone even touches the file system. With identity-based authentication, centralized controls, and full observability, you don’t have to worry about every chmod or chown command going wrong.
Want to simplify Linux access without sacrificing security? Book a StrongDM demo and see how it’s done.
Frequently Asked Questions
What do the symbols rw-rw-r-- mean in Linux permissions?
The owner and group can read and write; others can only read the file.
What are the different types of permissions in Linux?
Read (r), Write (w), and Execute (x)—applied to owner, group, and others.
What is chmod 755, 777, or 666 in Linux?
755: Owner can read/write/execute; group and others can read/execute.777: Everyone can read/write/execute (not recommended for security).666: Everyone can read/write; no one can execute.