Kubernetes RBAC Explained: Challenges, Approaches, and More

Written by
John MartinezLast updated on:
October 17, 2025Reading time:
Contents
Built for Security. Loved by Devs.
- Free Trial — No Credit Card Needed
- Full Access to All Features
- Trusted by the Fortune 100, early startups, and everyone in between
If your Kubernetes journey started with a handful of team members and a small cluster consisting of only a few nodes, you might not have a systematic approach to authorization yet. Perhaps you even granted everyone on your team cluster admin permissions to keep management simple.
But not every user needs unrestricted ability to create, modify, and delete resources. As the number of cluster nodes, applications, and team members increases, you’ll want to limit the resources your team members and applications can access, as well as the actions they can take.
The Role-Based Access Control (RBAC) framework in Kubernetes allows you to do just that. For example, it can help to ensure that developers only deploy certain apps to a given namespace or that your infrastructure management teams have view-only access for monitoring tasks.
Unfortunately, managing RBAC in Kubernetes comes with a certain amount of complexity and manual effort. In this article, we’ll provide some strategies for managing RBAC at scale.
Understanding Kubernetes RBAC
In Kubernetes, ClusterRoles and Roles define the actions a user can perform within a cluster or namespace, respectively. You can assign these roles to Kubernetes subjects (users, groups, or service accounts) with role bindings and cluster role bindings. Kubernetes allows you to configure custom roles or use default user-facing roles, including, but not limited to:
- Cluster-admin: This “superuser” can perform any action on any resource in a cluster. You can use this in a ClusterRoleBinding to grant full control over every resource in the cluster (and in all namespaces) or in a RoleBinding to grant full control over every resource in the respective namespace.
- Admin: This role permits unlimited read/write access to resources within a namespace. This role can create roles and role bindings within a particular namespace. It does not permit write access to the namespace itself.
- Edit: This role grants read/write access within a given Kubernetes namespace. It cannot view or modify roles or role bindings.
- View: This role allows read-only access within a given namespace. It does not allow viewing or modifying of roles or role bindings.
You can find even more information about these user-facing roles and others in the Kubernetes documentation.
⚠️ Traditional PAM deployments have gaps. Learn how to protect your databases, the cloud, Kubernetes, and more with our legacy PAM augmentation guide.
Practical challenges of Kubernetes role-based access control
Kubernetes RBAC provides a way to regulate user actions with granularity. However, as you provision access, you may run into some common issues:
- Manual configuration of roles: Kubernetes does not offer native tools to facilitate automatic granting of roles or updating of role bindings. Instead, admins need to manually set up each role binding for new team members or each new namespace. To update a role, you must recreate and replace the existing role. Revoking access requires manually deleting the user’s RoleBinding configuration. With so much manual management that only increases as your teams grow, you’ll likely make some mistakes, like duplicating role grant access, which complicates role revocation.
- Visibility into user access: Kubernetes offers no built-in tools for easily identifying which level of access a user has within a cluster. You can look up role binding configurations manually, but you won’t have a centralized way to track this data across a cluster. With the lack of visibility, sometimes admins create roles that they do not end up using or they assign roles to subjects that don’t exist within a cluster. This unnecessary configuration data makes it even more difficult to gain visibility into roles across the cluster.
- Visibility into cluster configurations: Kubernetes also lacks functionality to help you manage your complex RBAC configurations. It’s up to you to keep track of your Roles, RoleBindings, ClusterRoles, ClusterRoleBindings, ServiceAccounts, Groups, tokens stored as Secrets, and whatever else you’ve configured.
Put simply, Kubernetes RBAC does not provide much help when it comes to managing or monitoring configuration data. You’ll need a good strategy to reduce the manual effort associated with managing RBAC in Kubernetes.
Two approaches to Kubernetes RBAC
Let’s explore two Kubernetes RBAC approaches:
Option 1: A simplified, manual RBAC approach
This simplified manual strategy provides an approachable way to move towards provisioning granular access with your Kubernetes RBAC implementation.
Instead of creating role bindings for individual users, you’ll create role bindings based on user types. You’ll also create ServiceAccounts for each application. This approach helps admins decrease the number of configuration files under management without any external tools.
Creating roles for users per user type
To begin, decide on some generic user types and the level of access each requires. These decisions will depend on your organizational needs and the authentication method. Once you’ve evaluated, you can configure role bindings for each type of user.
As an example, let’s say your organization needs roles for three different user types: infrastructure monitoring team members, established devs, and cluster admins.
For the infrastructure monitoring teams, you could configure a Role that gives read-only access (using the verbs “get,” “list” and “watch”) to a given namespace. And admin could also map new devs, who are still getting the hang of things, or anyone else who needs read-only access, to this Role:
apiVersion: rbac.authorization.k8s.io/v1kind: Rolemetadata: name: read-only namespace: defaultrules:- apiGroups: - "" resources: ["*"] verbs: - get - list - watchTo apply the Role to a user, you must define a RoleBinding. This will give the user access to all resources within the namespace with the permissions defined in the Role configuration above:
apiVersion: rbac.authorization.k8s.io/v1beta1kind: RoleBindingmetadata: name: read-only-bindingroleRef: kind: Role name: read-only #The role name you defined in the Role configuration apiGroup: rbac.authorization.k8s.iosubjects:– kind: User name: example #The name of the user to give the role to apiGroup: rbac.authorization.k8s.ioLikewise, a Role for developers who need not just the read-access rights from the example above, but also write-access, to a certain namespace (“dev” in this example) would look as follows:
apiVersion: rbac.authorization.k8s.io/v1
kind: Role
metadata:
 name: read-write
 namespace: dev
rules:
- apiGroups:
 - ""
 resources: ["*"]
 verbs:
 - get
 - list
 - watch
 - create
 - update
 - patch
 - delete
The associated RoleBinding would look like:
apiVersion: rbac.authorization.k8s.io/v1beta1kind: RoleBindingmetadata: name: read-write-bindingroleRef: kind: Role name: read-write apiGroup: rbac.authorization.k8s.iosubjects:- kind: User name: example apiGroup: rbac.authorization.k8s.io
For superusers who need admin access to the entire cluster, change the "kind" value to "ClusterRole," which gives the user access to all resources within the cluster, instead of just one namespace:
apiVersion: rbac.authorization.k8s.io/v1kind: ClusterRolemetadata: name: superuserrules:- apiGroups: - "" resources: ["*"] verbs: - get - list - watch - create - update - patch - delete
And in this case, we’ll create a ClusterRoleBinding instead of a RoleBinding:
apiVersion: rbac.authorization.k8s.io/v1beta1kind: ClusterRoleBindingmetadata: name: superuser-bindingroleRef: kind: ClusterRole name: superuser apiGroup: rbac.authorization.k8s.iosubjects:- kind: User name: superuser apiGroup: rbac.authorization.k8s.ioIf you host K8s with a single cloud provider, you can use your cloud vendor’s identity and access management (IAM) framework for role configuration. (For example, admins can configure roles using Azure AD on Azure or IAM roles for clusters on AWS.) Do keep in mind, however, that a single cloud provider’s IAM framework cannot manage roles for a Kubernetes deployment that spans multiple clouds.
Create service accounts for each application
Kubernetes uses service accounts to authenticate and authorize requests by pods to the Kubernetes API server. Kubernetes automatically assigns newly created pods to the “default” service account in your cluster and all applications share this service account. However, this configuration may not be desirable if, for example, you are using some applications for development purposes, and want those applications to use a “dev” service account instead of a default one.
Just as we configured roles per user type, you can create service accounts that reflect application type in order to streamline management. To change the default Kubernetes behavior, first modify the pod’s YAML configuration file by setting the automountServiceAccountToken field to “false”:
apiVersion: v1kind: ServiceAccountmetadata: name: some-deploymentautomountServiceAccountToken: false
Then, use a kubectl command to create a custom service account name. The following command names the custom service account “dev”:
kubectl apply -f - <apiversion: v1kind:="" serviceaccountmetadata:="" name:="" dev
eof
<="" code="">apiversion:>
Now you can assign it to a pod by specifying the account name in the serviceAccountName field of the pod’s YAML configuration:
apiVersion: v1kind: ServiceAccountmetadata: name: dev-deploymentspec: automountServiceAccountToken: false serviceAccountName: devBenefits and drawbacks of the simplified manual approach
This simplified RBAC strategy reduces the amount of manual effort associated with creating individual roles and modifying them whenever the user access needs change. Instead, admins can create and administer a core set of roles and use them to manage the access of multiple users.
Unfortunately, this approach won’t completely eliminate manual effort. Admins might still need to create custom roles on an individual basis when the generic role bindings based on user type do not fit the needs of an individual user. And, you’ll still lack visibility into your configurations and user permissions. Thus, this approach still involves considerable manual effort to manage.
Option 2: Manage Kubernetes RBAC with tools and templates
The second approach involves adopting third-party tools that allow admins to use prebuilt templates to configure roles and apply them automatically across a cluster.
StrongDM offers a centralized and automated way to manage Kubernetes RBAC:
- First, admins configure roles and permissions within the Kubernetes cluster. (In hosted Kubernetes environments, you would use the cloud providers Identity and Access Management (IAM) services to do this.)
- Then, admins map these roles to "Datasources” within StrongDM. Users (or roles) are assigned to Datasources inside of StrongDM to grant access to the Kubernetes cluster.
- When a user connects to the Kubernetes cluster, StrongDM then leases the credentials automatically to Kubernetes based upon the Datasource mappings in StrongDM. Admins can configure roles and service accounts through the StrongDM user interface.
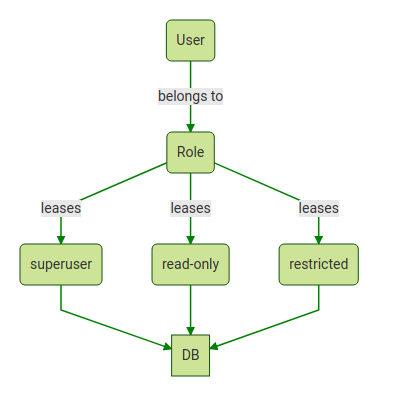
By integrating with identity providers such as Okta, OneLogin, GSuite and ADFS using OIDC, StrongDM allows Kubernetes to authenticate on the basis of credentials that one of these services manages. Then, admins can assign users to roles and modify their permissions through the centralized control plane, eliminating the need to juggle multiple RBAC configuration files manually.
StrongDM simplifies the process of modifying roles and revoking access. In addition, StrongDM's auditing and reporting features allow teams to track Kubernetes RBAC configurations from a central location in order to achieve cross-cluster visibility.
Provision Kubernetes access with ease
Kubernetes lacks the native functionality to help you manage RBAC policies without significant manual effort. StrongDM offers a simplified way to provision access to Kubernetes. With StrongDM, RBAC configurations are easy to deploy, update, and audit through a centralized interface.
Interested in learning more? Sign up for a free, fourteen-day StrongDM trial.
To learn more on how StrongDM helps companies with managing permissions, make sure to check out our Managing Permissions Use Case.
Kubernetes RBAC: FAQ
What is the default RBAC in Kubernetes?
Kubernetes comes with a built-in RBAC system that includes several default, user-facing roles. These include:
- cluster-admin: A superuser role with unrestricted access across the entire cluster.
- admin: Provides broad access within a specific namespace, including the ability to create roles and role bindings.
- edit: Grants read/write access within a namespace but doesn’t allow modifying roles.
- view: Offers read-only access within a namespace.
These default roles allow administrators to quickly assign a predetermined set of permissions without creating custom roles from scratch.
What is the difference between RBAC and permissions?
- RBAC (Role-Based Access Control): This is the framework or system used to manage access control. RBAC organizes permissions into roles and then assigns those roles to users, groups, or service accounts.
- Permissions: These are the specific allowed actions (for example, get, list, create, update, delete) on resources. Permissions are the building blocks defined within each role.
In short, RBAC is the overarching policy mechanism, and permissions are the actual actions that a user is allowed to perform as defined within a role.
What is the difference between Role and ClusterRole?
- Role: A Role is a namespaced resource. It defines a set of permissions (specific actions on resources) that are confined to a single namespace. This is useful when you want to restrict access to resources within a particular segment of your cluster.
- ClusterRole: A ClusterRole is a cluster-scoped resource. It defines permissions that can span across all namespaces. ClusterRoles are typically used for users or applications that need access to cluster-wide resources (or multiple namespaces), such as granting a user full cluster administration privileges.
Together, these concepts enable granular access control—Roles for namespace-specific permissions and ClusterRoles for broader, cluster-wide access.
Next Steps
StrongDM unifies access management across databases, servers, clusters, and more—for IT, security, and DevOps teams.
- Learn how StrongDM works
- Book a personalized demo
- Start your free StrongDM trial
Categories:

About the Author
John Martinez, Technical Evangelist, has had a long 30+ year career in systems engineering and architecture, but has spent the last 13+ years working on the Cloud, and specifically, Cloud Security. He's currently the Technical Evangelist at StrongDM, taking the message of Zero Trust Privileged Access Management (PAM) to the world. As a practitioner, he architected and created cloud automation, DevOps, and security and compliance solutions at Netflix and Adobe. He worked closely with customers at Evident.io, where he was telling the world about how cloud security should be done at conferences, meetups and customer sessions. Before coming to StrongDM, he lead an innovations and solutions team at Palo Alto Networks, working across many of the company's security products.
You May Also Like
